Likewise, its three different snip modes in the form of Rectangular, Freeform, and Windows snips make it really easy to take a screenshot of the desired content. However, not everyone is able to make full use of these tools. Right after installing the latest Windows security update, the Snipping Tool is no longer working on Windows 11.
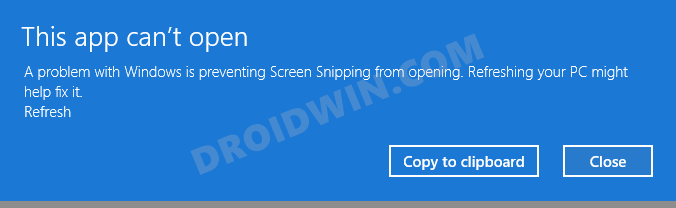
Whenever they are trying to launch the tool, they are instead being greeted with the ‘This app can’t open. A problem with Windows is preventing Screen Snipping from opening” error message. If you are also getting bugged with this issue, then this guide is here to help you out. In this tutorial, we will show you various methods to fix the Snipping Tool not working on Windows 11 issue. Follow along.
How to Fix: Snipping Tool Not Working in Windows 11
Do note that there’s no universal fix as such. You will have to try out each of the below-mentioned workarounds and see which one works best in your favor. So keeping that in mind, let’s get started.
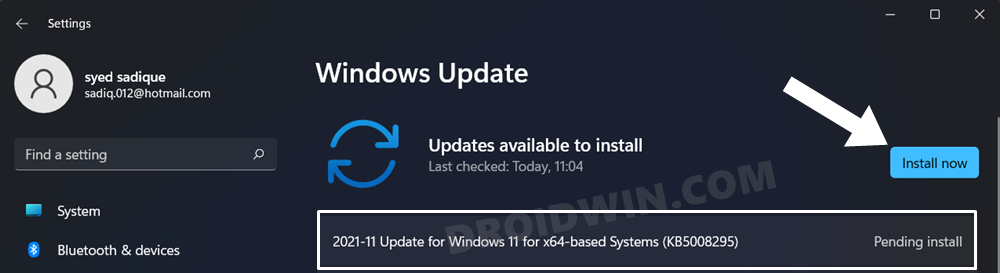
UPDATE 1: Install Windows 11 (KB5008295) Update
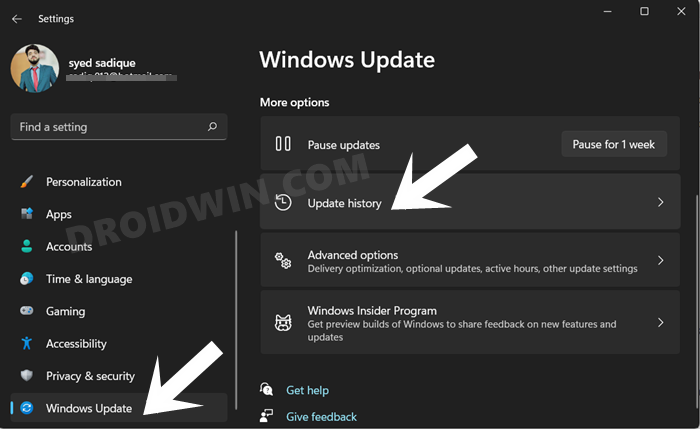
Microsoft has rolled out a new update titled “2021-11 Update for Windows 11 for x64-based Systems (KB5008295)” that has fixed the issue of Snipping Tool not working on Windows 11. So head over to Settings > Windows Update and download and install the said update right away. Once done, restart your PC and the issue should be rectified. However, if you face this issue again any time in the near future, then you could refer to our below-mentioned workarounds.
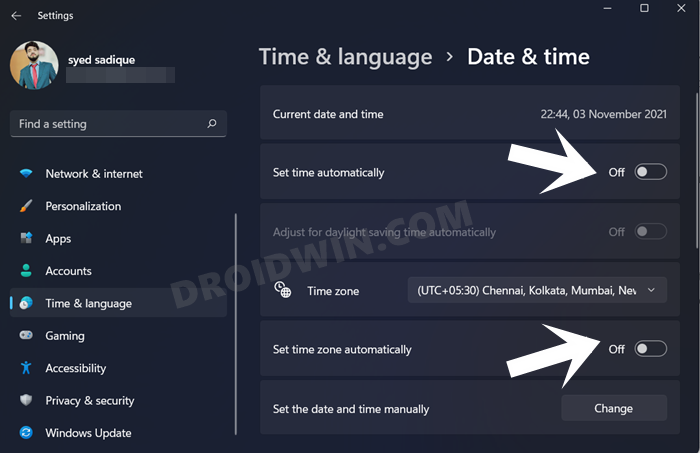
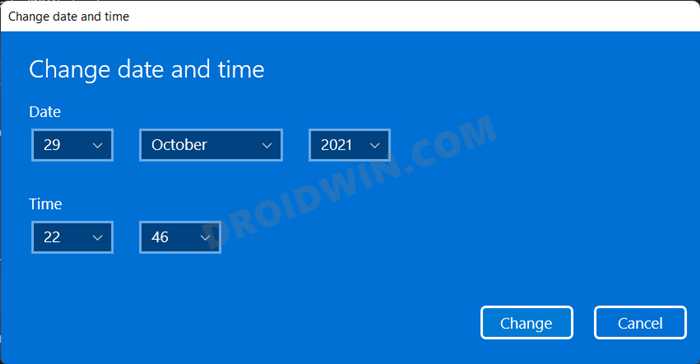
FIX 1: Use the Date Tweak
For many users. this issue first started after installing a security update that was rolled out on 31st October 2021. As strange as it may sound, rolling back the system date to a couple of days before did manage to rectify this issue for many users. So refer to the below instructions to try it out:
FIX 2: Install an Old Version of Snipping Tool
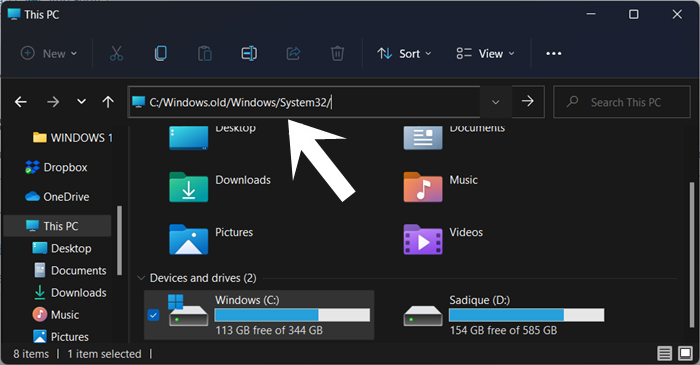
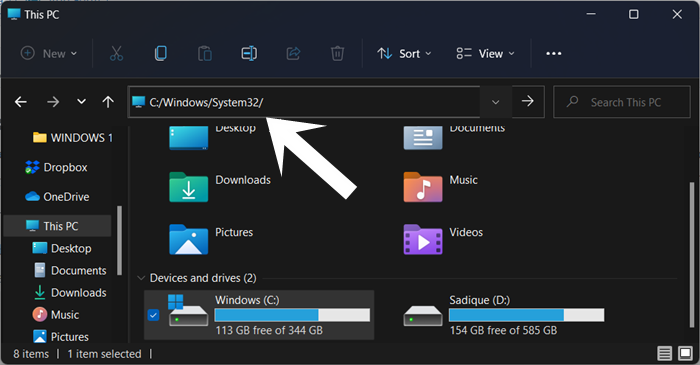
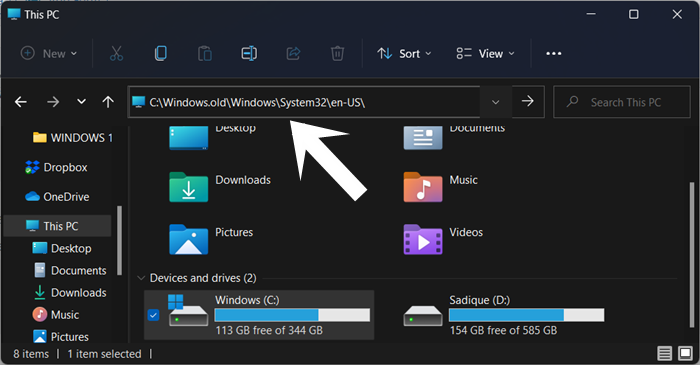
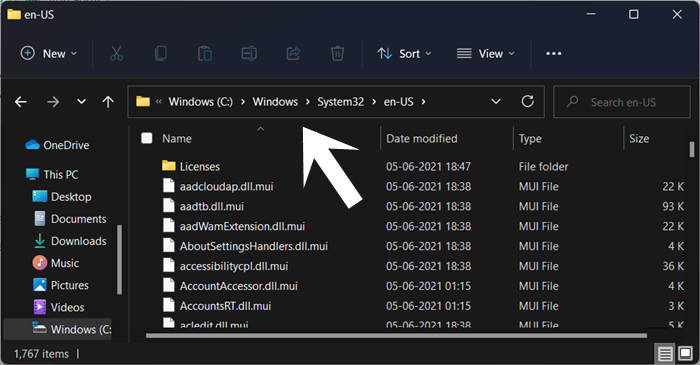
If you have recently updated your PC to Windows 11, then there would be a Windows 10backed up folder by the name of Windows.old that would be having backed-up apps and system files, including the Snipping Tool. So as of now, we will be installing that Windows 10 version over the current one as performing this downgrade might fix the underlying issue Now check if the Snipping Tool not working issue on your Windows 11 PC has been fixed or not. If it works out for you, then you could also create a shortcut of the ‘working’ Snippet Tool onto your desktop. For that, head over to the location where you had pasted the SnippingTool.exe [C:/Windows/System32/], then right-click on that EXE file > Show More Options > Create a Shortcut.
FIX 3: Re-Enable Clipboard History
By default, the screenshots taken by the Snippet Tool are saved in the clipboard. So if there’s any sue with the clipboard, then its repercussion is bound to be faced by the apps that make use of it, including the Snippet Tool. Hence you should consider disabling and then re-enabling the Clipboard History, which could be done as follows:
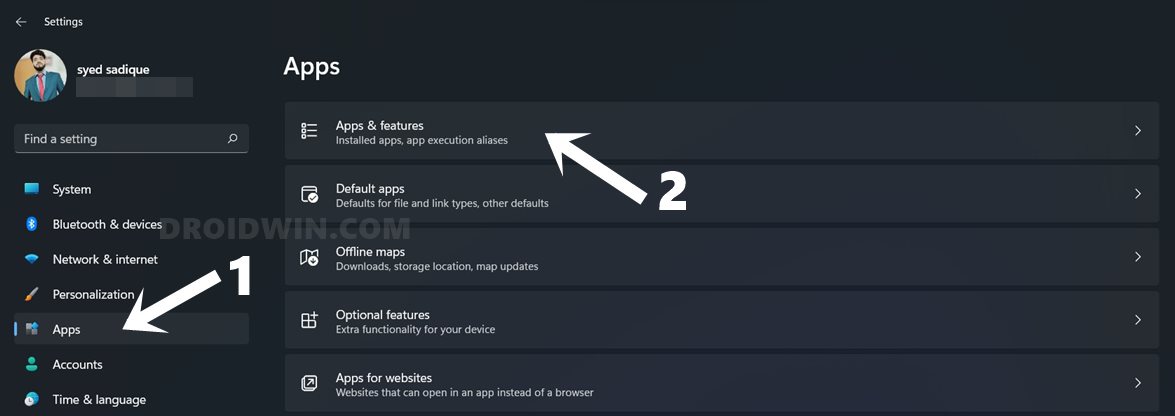
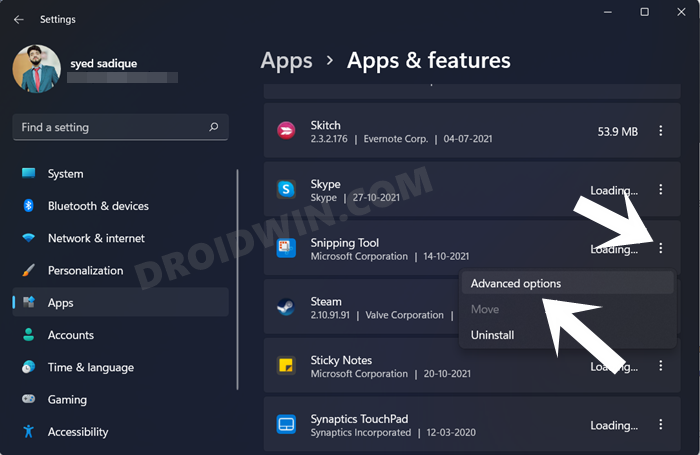
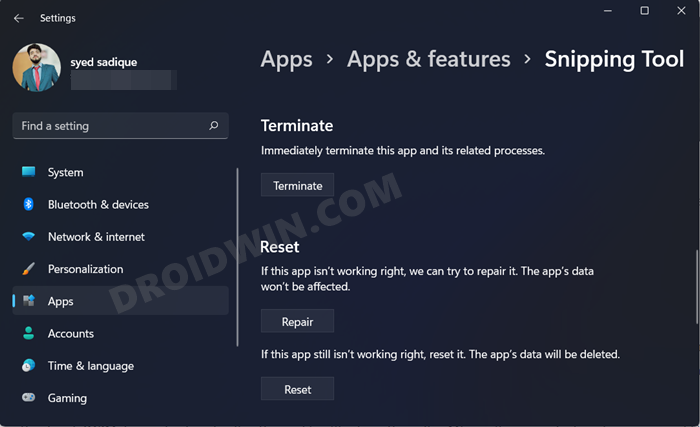
FIX 4: Reset/Repair Snipping Tool
If the tool’s data has got corrupted, then repairing it or bringing it back to its factory default state might be the best route forward. And as of now, we will be trying both these approaches. Follow along:
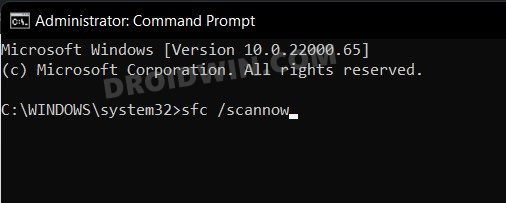
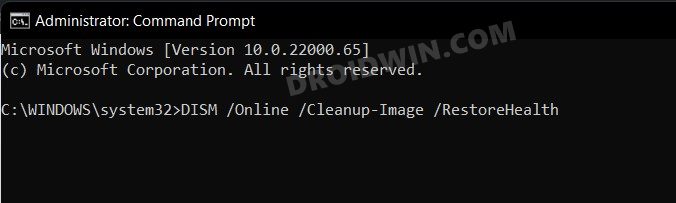
FIX 5: Use the SFC and DISM Command
System File Checker and Deployment Image Servicing and Management are two command-line utility tools that scan for the corrupt Windows files and then replace them with their working counterpart. The major difference between the two is that the SFC replaces the corrupt files with the working ones from the cached directory on your PC. On the other hand, DISM does so by downloading the working files from the online Microsoft servers. And as of now, we would be making use of both these tools to fix the ‘This app can’t open. A problem with Windows is preventing Screen Snipping from opening” error. Follow along. Once DISM finishes the scanning, it is recommended to reboot your PC. Once it boots up, check if it is able to fix the Snipping Tool not working issue on your Windows 11 PC.
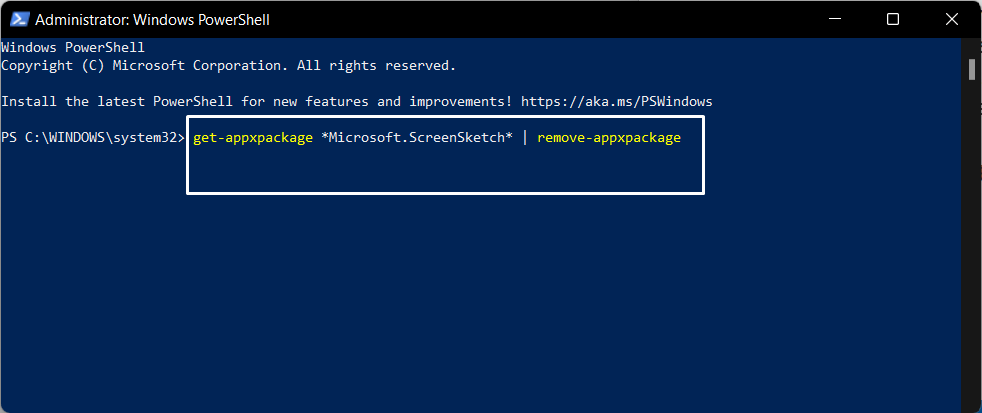
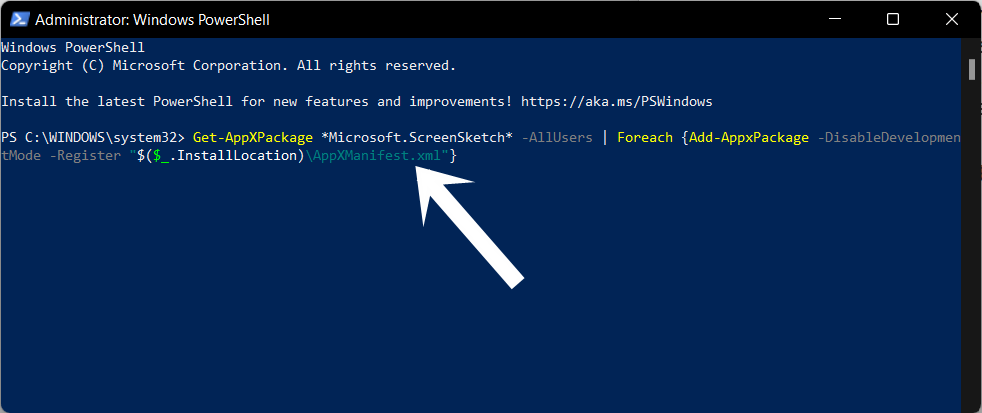
FIX 6: Reinstall Snipping Tool
If none of the aforementioned methods spelled out success, then you should take the nuclear approach of uninstalling the currently installed Snipping Tool and then re-installing its latest build. Here’s how:
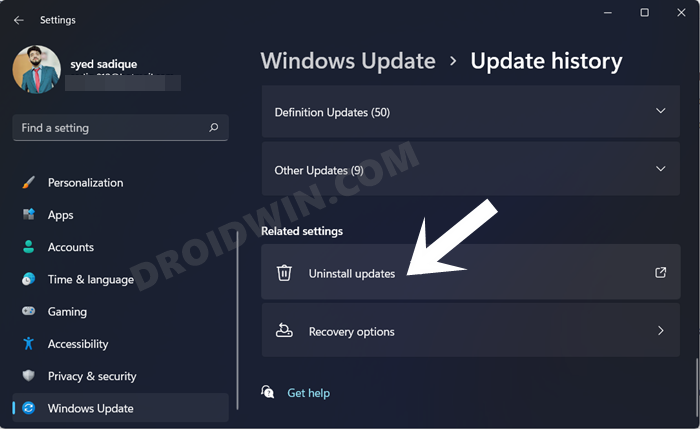
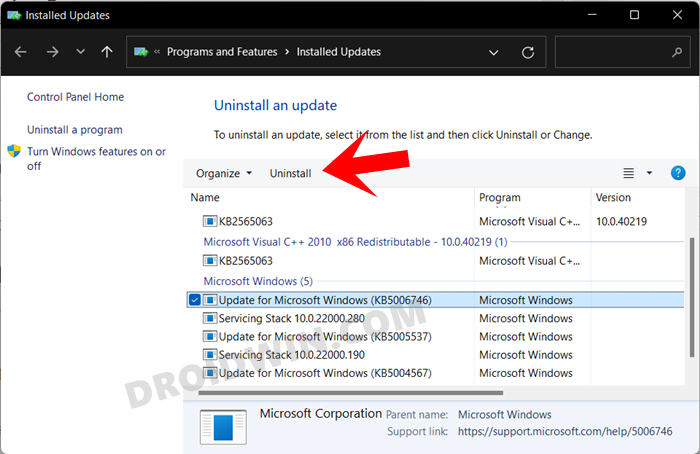
FIX 7: Uninstall Windows Security Update KB6006674
Some of the users were able to fix the Snipping Tool issue after uninstalling the Security Update KB6006674. However, with that, you will also end up losing Windows 11 right-click context menu, Windows 11 File Explorer, and the Windows 11 Display & Personalization menus. And to be fair, this is too much of a sacrifice to be made. However, if you are ready for the same, then here’s what you need to do:
FIX 8: Try out Official/Unofficial Alternatives
If you aren’t able to make the Snipping Tool up and running, then for the time being you could consider using its alternatives. As far as the official alternatives are concerned, here are a few:
You could use the Print Screen key to capture all the contents on your screen. Then paste the screenshot in any app such as Paint and carry out the desired edit.Likewise, you could also make use of the Windows+Print Screen shortcut keys to take a distraction-free screenshot. It will be saved in the following location:C:\Users(username)\OneDrive\Pictures\ScreenshotsApart from that, you could also make use of the Xbox Game Bar to take a screenshot. For that, you may use the Windows + Alt + Prt Scr shortcut keys. The screenshots are saved in the following directory: C:\Users\UserName\Videos\CapturesAs far as unofficial alternatives go, you could give a shot to the following apps:Greenshot: Download LinkShareX: Download LinkSnipaste: Download LinkScreenpresso: Download LinkSnagIt (paid): Download Link
With this, we round off the guide on how you could fix the Windows 11 Snipping Tool not working. We have shared eight different methods for the same. Do let us know in the comments section which one worked out in your favor. Likewise, all your quires are welcomed in the comments below.
Windows 11 Updates Failed Error: How to FixWindows 11 Restarts/Reboots Automatically: How to FixHow to Fix Microsoft Store Not Working on Windows 10/11Windows 11 Start Menu Not Working: How to Fix [10+ Methods]
About Chief Editor