Pixel series has always been the go-to choice for many, and the reasons for the same is there for everyone to see. With a clean and stock Android, free of bloatware apps (not counting pre-installed Google apps as bloatware), and the fastest Android OS upgrades, well we couldn’t have asked for more. Along the same lines, the Pixel series have always known to have an absolute beast of the camera, and its fifth iteration is no different either. While the specs sheets aren’t going to blow you away, but for many, it would do its job in the most efficient way possible without any compromises. Along the same lines, the devices have always known to be quite an active player in custom development. Google on their part, release the kernel sources pretty quickly, after which the tech community comes into action. There are a plethora of tweaks, modifications, and custom binaries that are available for your device at this instance. There are just two prerequisites that your Pixel 5 device needs to qualify- an unlocked bootloader and administrative access (root). And in this guide, we will show how to do just that. Given below are the steps to unlock the bootloader and root your Pixel 5 device via Magisk without TWRP Recovery.
How to Pass Magisk SafetyNet on Rooted Android 11Root Android 11 via Magisk Patched boot.img (without TWRP)Fix Magisk patched boot.img issue while Rooting Android 11Disable DM-Verity or Android Verified Boot without TWRP
Advantages and Risks of Bootloader Unlock | Root
Well, bootloader unlocking is the entry point for any and every customization. Once you do so, then you could literally install a plethora of tweaks. These include the installation of custom ROMs or a custom recovery like TWRP. Along the same lines, you could also gain access to the system partition by rooting the device via magisk. Once rooted, you could then flash Magisk Modules, Substratum Themes, Xposed Frameworks among other mods. However, these tweaks do bring in a few risks as well. To begin with, your device warranty might become null and void. Along the same lines, you will lose all the data on your device. Apps like Google Pay and Netflix might not be able to function along the expected lines (though there’s a fix by hiding root- see STEP 6 of this guide). You wouldn’t be able to install OTA on a rooted Android the conventional way, (though you could install OTA on your rooted Pixel- see STEP 7 of this guide). With that said, if you ready to proceed ahead (for which Droidwin wouldn’t be held responsible), then here are the steps to root your Pixel 5 device via Magisk without TWRP Recovery.
Fix TWRP Error 7 (While Flashing Custom ROM via TWRP)How to Fix FAILED (remote: unknown command) ErrorHow to Permanently Install TWRP without TWRP ZIP File (only using TWRP.img file)Root Android Devices Without TWRP Recovery
How to Root Google Pixel 5 via Magisk without TWRP
Before we list out the instructions, there are a few requirements that your device needs to qualify. Make sure to checkmark all these requirements and only then continue with the procedure.
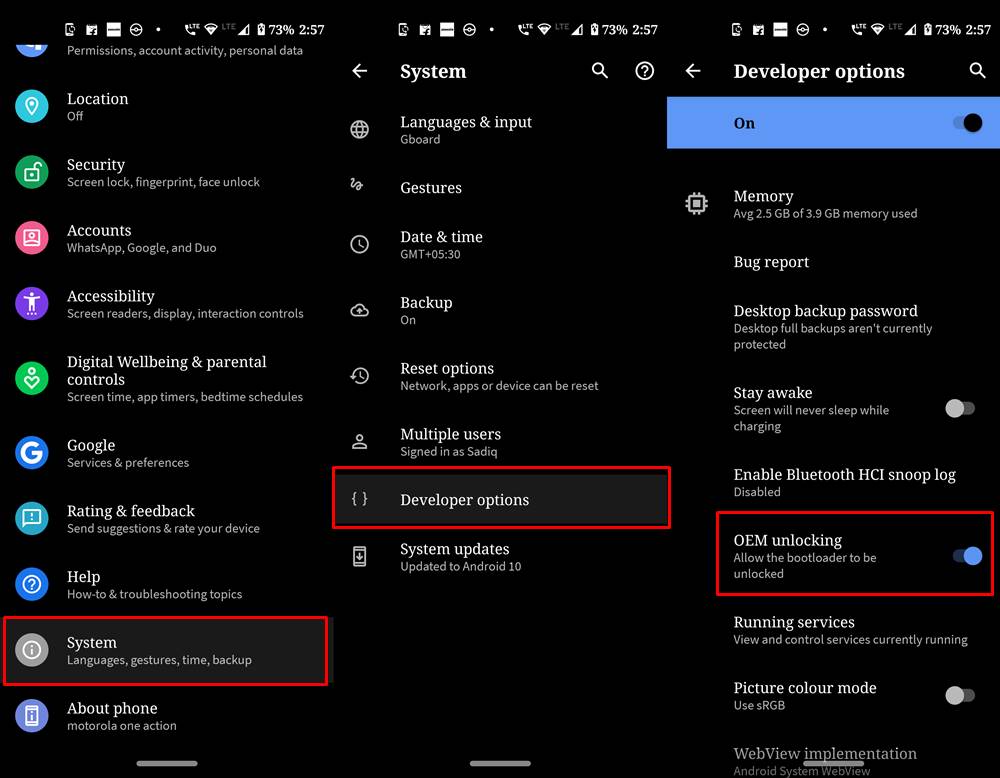
STEP 1: The Prerequisites
To begin with, create a complete device backup. This is because unlocking the bootloader will wipe off all the data from your device. Even if you have unlocked the bootloader and are here just to root your device, it is recommended to take a backup, just to be on a safer side.Next up, enable USB Debugging and OEM Unlock on your device. The former will make it possible to identify your device in the ADB Mode. The latter on the other hand will allow you to carry out the unlocking process. So head over to Settings > About Phone > Tap on Build Number 7 times > Go back to Settings > System > Advanced > Developer Options > Enable USB Debugging and OEM Unlocking. Download and install the Android SDK Platform Tools on your PC. This tool from Google will provide you the necessary ADB and Fastboot binaries.Next up, download the latest Magisk Manager. As of now, we would suggest you download Magisk Canary. This is because the latest Magisk stable build is causing a few issues while patching the stock boot.img file on Android 11 devices. More on that later on in this guide [see STEP 4].Also, download the Google Pixel 5 stock firmware: “redfin” for Pixel 5. Make sure to download the same firmware that is currently installed on your device. You could check the same from the About Phone section. So even if you are currently having a two-three-month-old firmware installed on your device, download the same build from Google’s Firmware Download page as well. But why?Well, we would be extracting the stock boot.img file from this downloaded firmware, patching it and then flashing it onto your device. Any conflict in that boot.img file and the one installed firmware on your device will lead to unnecessary troubles (soft-brick, bootloop, etc).
That’s it. These were all the requirements. You may now proceed with the steps to unlock the bootloader and root Pixel 5 via Magisk without TWRP.
STEP 2: Unlock Bootloader of Pixel 5
Stepping into custom development, the first requirement is that your device needs to have an unlocked bootloader. Follow the below steps for the same: That’s it. Your device will now boot to the OS. The first boot might take up some time, this is completely normal. Likewise, you will have to set up your device from scratch as a data wipe has taken place. That’s it. Your Pixel 5 bootloader is now unlocked, you may now proceed with the steps to root it via Magisk without TWRP.
How to Flash Various Files in A/B Partition DevicesInstall Custom ROMs on any Android Device- Includes A/B Partition[GUIDE] Flash ROMs/Magisk/TWRP/Kernels on A/B Partition Devices
STEP 3: Get Pixel 5 Stock Boot.Img File
Entering into the rooting domain, the first step requires you to get the stock boot.img file for your Pixel 5. For that, Google has its stock firmware as OTA files and Factory Image. It is always recommended that you download the Factory Image and not the OTA while carrying out such tasks. This is because OTA is more like an incremental update package and doesn’t contain all the partition file.
So download the Pixel 5 Factory Image: “redfin” for Pixel 5. And as mentioned in the Prerequisites section, make sure to download the same firmware that is currently installed on your device. Once downloaded, extract it and then you should see the image-redfin folder. Extract this folder as well and then you will get the stock boot.img file. Copy this file and transfer it to your device.
STEP 4: Patch Pixel 5 Stock Boot.img via Magisk (Android 11)
It’s now time to patch Pixel 5 stock boot.img file via Magisk. As mentioned in the Prerequisites, the stable magisk build is having a few issues in carrying out this task. So you should download Magisk Canary and install it onto your device. After this, launch the app, tap on the Settings icons > go to Update Channel > select Canary. For comprehensive coverage on this topic, please refer to our guide: Fix Magisk patched boot.img issue while Rooting Android 11. With that said, Let’s now proceed with the steps. Make sure that you have transferred the stock boot.img file to your device.
STEP 5: Flash Pixel 5 Patched Boot.img file via Fastboot
Now that you have got the patched boot.img file, it’s time to flash it via Fastboot Commands and hence root your device. Follow the below instructions for the same: That’s it. These were the steps to root your Pixel 5 via Magisk without TWRP. If you have any queries concerning the aforementioned steps, do let us know in the comments section below. We will get back to you with a solution at the earliest. Furthermore, given below are the instructions to hide root on your rooted Pixel 5 from many apps and how to install OTA on rooted Pixel 5. Do keep in mind that these are completely optional and solely up to you if you wish to try it out or not. The steps to root your Pixel 5 via Magisk without TWRP has been completed, these are just some extra useful information that we thought of sharing with you all.
How to Disable DM-Verity or Android Verified Boot without TWRP.Everything About Magisk- Manager, Modules and MoreBest Magisk Modules of 2020 [PART-1]Patch Stock Boot Image via Magisk and Flash it using Fastboot
STEP 6: Hide Root on Pixel 5
Now that you have rooted your device, you might face an issue or two with certain banking apps and games. However, there is a pretty nifty workaround for the same. It involves randomizing Magisk so that other apps aren’t able to recognize that your device has it installed and hence is rooted. So if you prefer to carry out this step, then please refer to our detailed guide on this topic: How to Pass Magisk SafetyNet on Rooted Android 11.
STEP 7: Installing OTA on Rooted Pixel 5
Well, one of the biggest complaints that many rooted users had was their inability to install OTA on their device. Thankfully, there’s now a pretty easy fix for that. This involves restoring the stock boot.img via magisk, then installing the OTA and finally re-installing the patched boot.img to the inactive slot. Here are the complete instructions for the same: How to Install OTA Updates in Rooted Android Device.
About Chief Editor
![]()

![]()
![]()
![]()
