So to cater to the need of this niche segment of users, Xiaomi came up with its Android One series of devices. In practice, it means that the devices would have a clean stock Android OS experience and guaranteed faster OS upgrades. While the first part stood true, unfortunately, the same cannot be said about the second half. Well, even the official OTA updates released by Xiaomi ending up bricking the Mi A3! Such has been the fiasco that the company decided to put an end to this series for good. So the third iteration of this series is the last one to make its way. But in spite of all the strings attached, it is still quite a decent offering from Xiaomi. And it has continued this tradition over to custom development as well. There are a plethora of mods and tweaks available that you could try out onto your device. One among them is the option to replace the device’s stock recovery with a custom one. And in this guide, we will show you how to do just that. So without further ado, let’s begin with the steps to install TWRP Recovery on your Xiaomi Mi A3 device.
How to Install TWRP Recovery on AndroidHow to Uninstall Magisk Modules using TWRP RecoveryCreate and Port TWRP Recovery to any Android DeviceHow to Update TWRP Recovery on any Android Device
Installing TWRP Recovery on Xiaomi Mi A3
We are listing the detailed instructions in separate sections for ease of understanding. Proceed ahead in the exact same sequence as mentioned. Droidwin and its members wouldn’t be held responsible in case of a thermonuclear war, your alarm doesn’t wake you up, or if anything happens to your device and data by performing the below steps.
STEP 1: Unlock Bootloader on Mi A3
First and foremost, you will have to unlock the bootloader on your Mi A3 device. For that, you may refer to our guide on How To Unlock Bootloader on Xiaomi Mi A3. However, if you don’t wish to refer to that guide, then here are the shorter instructions. Do keep in mind that the below steps will wipe off all the data from your device and will make the device’s warranty null and void.
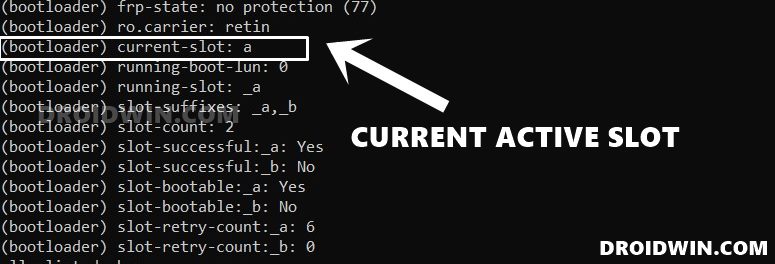
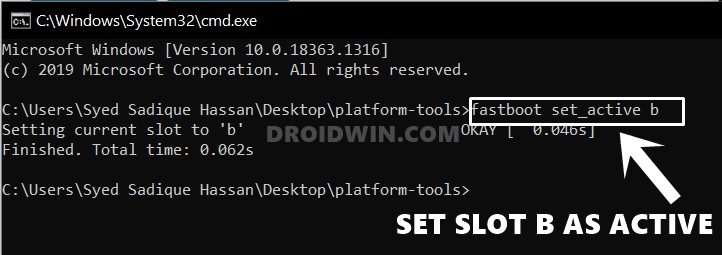
STEP 2: Change Current Active Slot
You will now have to check your current active slot and then change it to the inactive slot. We have covered a comprehensive guide on this same topic, it is highly recommended you check it out: How to Check and Change Current Active Slot on Android. The shorter instruction follows below:
How to Fix Soft brick/Bootloop after installing TWRP RecoveryCopy Move Rename Delete Files and Folders via TWRP RecoveryHow to Uninstall TWRP and Restore Stock Recovery on AndroidHow to Change Language in TWRP Recovery
STEP 3: Download TWRP Recovery for Mi A3
Download the unofficial TWRP Recovery for your Xiaomi Mi A3 device. We will like to thank XDA Recognized Developer mauronofrio for the recovery files. TWRP IMG File
Android 9: twrp-3.3.1-17-laurel_sprout-Pie-mauronofrio.imgAndroid 10: twrp-3.3.1-17-laurel_sprout-Q-mauronofrio.img
TWRP ZIP File
twrp-3.3.1-17-laurel_sprout-Installer-mauronofrio.zip
STEP 4: Flash TWRP to Boot Partition of Mi A3
You will now have to flash the TWRP IMG file to its boot partition. For that, transfer the downloaded recovery file to the platform-tools folder on your PC.
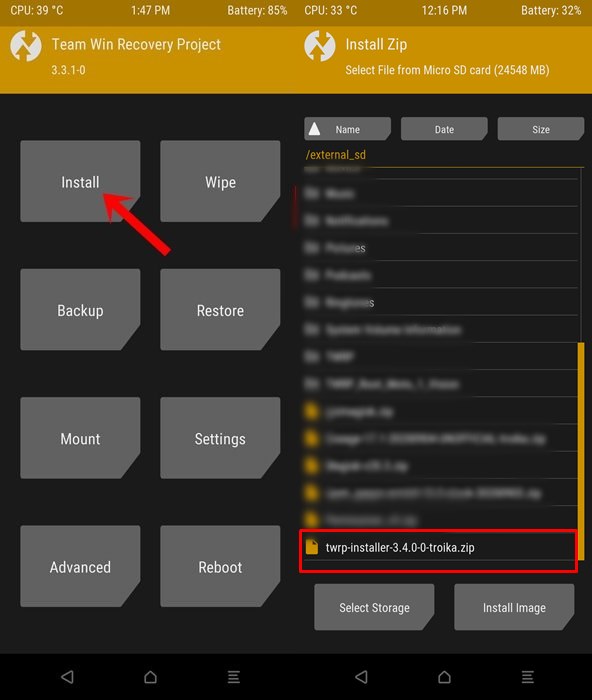
STEP 5: Install TWRP ZIP on Mi A3
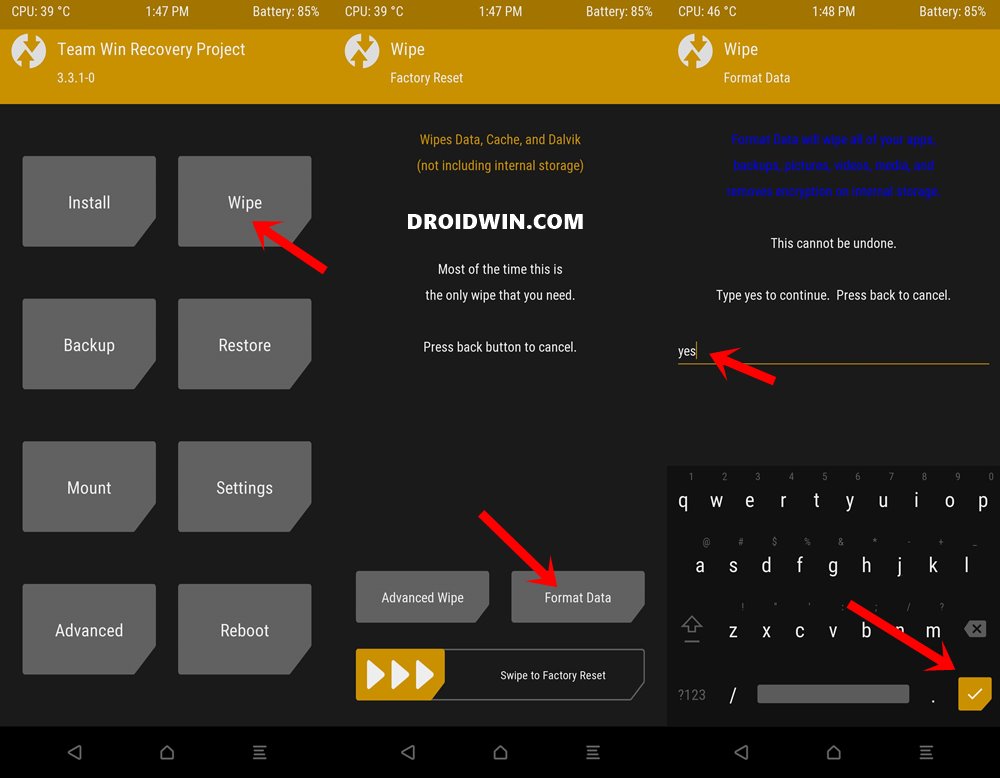
As of now, your device is booted to TWRP, it’s time to permanently install it. But before that, verify if TWRP is able to read the files present in the Internal Storage. If it can, then the decryption is successful and you could directly start off from the third point of this section (transferring TWRP ZIP). However, if it cannot read phone memory (showing 0MB Internal Storage or files are showing a random string of characters), then you will have to decrypt the storage, which could be done as follows: Now that the TWRP Recovery is installed on your Xiaomi Mi A3, there is just one task left to do: booting to the ‘actual’ current slot. Follow along.
How to Pass Magisk SafetyNet on Rooted Android 11Root Android 11 via Magisk Patched boot.img (without TWRP)Fix Magisk patched boot.img issue while Rooting Android 11How to Fix No WiFi, Calls, Network after Root or Custom ROM
STEP 6: Boot Mi A3 to Original Active Slot
So here is what is happening, TWRP has been flashed to both the slots, but the OS is still installed on one slot- which is the original active slot. However, in STEP 2, we have changed the actual active slot to the inactive one (in my case I had switched from A to B) and then did the rest of the work. So to boot to the OS we will have to switch to the slot which has the system.img file installed aka the OS imstalled. Here’s how it could be done:
That’s it. With this, we conclude the guide on how to install TWRP Recovery onto Xiaomi Mi A3. If you have any queries concerning the aforementioned steps, do let us know in the comments. We will get back to you with a solution at the earliest. Furthermore, there is another method to carry out this task, and that only requires TWRP IMG file. For that, you will first have to boot it to TWRP via its IMG file and then flash this TWRP IMG file to the Ramdisk partition. However, the above method mentioned above worked perfectly for many users. Likewise, I haven’t written about the second method here in this guide as it might have made it more complicated. With that said, if this method does give out any error or causes any issue, then do let me know in the comments section, I will cover a separate guide using the second method as well.
About Chief Editor