While does actively supports the bootloader unlocking process, this is where things come to a standstill. Be it flashing custom binaries, mods, or rooting your device via magisk, things aren’t easy, even from the tech enthusiasts’ point of view. Furthermore, the matter gets even complicated considering the fact that most Xperia devices have a recovery-in-boot arrangement. This means that the kernel or boot image uses the FOTAKernel method. Henceforth installing a custom recovery on Sony devices takes a lot of effort. Fortunately, Xperia 10 and 10 Plus doesn’t fall under this bracket. Hence you could still follow one of the traditional methods to install the TWRP custom recovery. And in this guide, we will help you with just that. So with that in mind, let’s check out the instructions to install TWRP Recovery on Sony Xperia 10 and Xperia 10 Plus devices.
How to Fix TWRP Error 1 on any Android DeviceHow to Fix TWRP 0MB Internal Memory IssueFix TWRP Error 70 [With Screenshots]How to Fix TWRP Error 20 How to Fix TWRP Error 7 on any Android
Benefits and Risks of Installing TWRP
Once you have installed the TWRP Recovery onto your device, there are a plethora of things to try out. To begin with, you could create and restore Nandroid backups. Likewise, you could also flash ZIP and IMG files. These include every custom and GSI ROM [Android 12 GSI is now live], and all the mods ever made to date. Likewise, you could also flash the Magisk Installer ZIP to root your device. This is turn will give you administrative privileges. Hence you could then flash Magisk Modules, Xposed Framework, Substratum Themes among others. But there are a few risks with this method as well. To begin with, flashing a custom recovery requires an unlocked bootloader. when you do so, your device’s warranty might become null and void. Likewise, it will also erase all the data on your device. WideVine L1 Certification will also be degraded to L3, hence you wouldn’t be able to stream Netflix in HD. If that’s all well and good, then let’s get on with the guide to install TWRP Recovery on Sony Xperia 10 and Xperia 10 Plus devices. Follow along.
How to Install TWRP Recovery on Sony Xperia 10/10 Plus
The below instructions are listed under separate sections for ease of understanding. Make sure to follow in the exact same sequence as mentioned below. Droidwin and its members wouldn’t be held responsible in case of a thermonuclear war, your alarm doesn’t wake you up, or if anything happens to your device and data by performing the below steps.
STEP 1: Unlock Bootloader on Sony Xperia 10/10 Plus
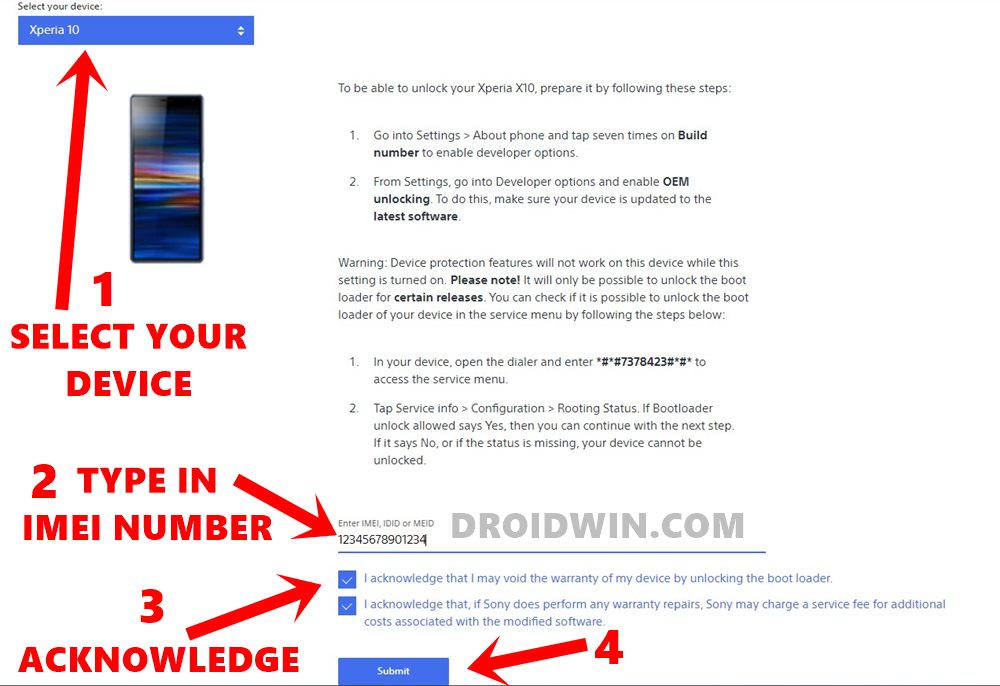
First and foremost, you will have to unlock the device’s bootloader. For that, you will have to get hold of an Unlock Code from Sony corresponding to your device’s IMEI number and then use it in a Fastboot Command. Here are the complete instructions for the same (make sure to take a backup beforehand): How to Unlock Bootloader on any Sony Xperia Device.
STEP 2: Download TWRP Recovery for Sony Xperia 10/10 Plus
STEP 3: Install Android SDK
Now download and install the Android SDK Platform Tools on your PC. These are the official ADB and Fastboot binary files provided by Google. So download it and extract it to any convenient location on your PC and you should get the platform-tools folder. Transfer the downloaded twrp.img file to this folder.
STEP 4: Enable USB Debugging on Xperia 10/10 Plus
You will have to enable USB Debugging on your device so that your device gets recognized by your PC in ADB mode. This mode will then be used to boot your Sony Xperia 10/10 Plus to Fastboot and hence install the TWRP Recovery. So head over to Settings > About Phone > Tap on Build Number 7 times > Go back to Settings > System > Developer Options > Enable USB Debugging.
STEP 5: Boot Xperia 10/10 Plus to Fastboot Mode
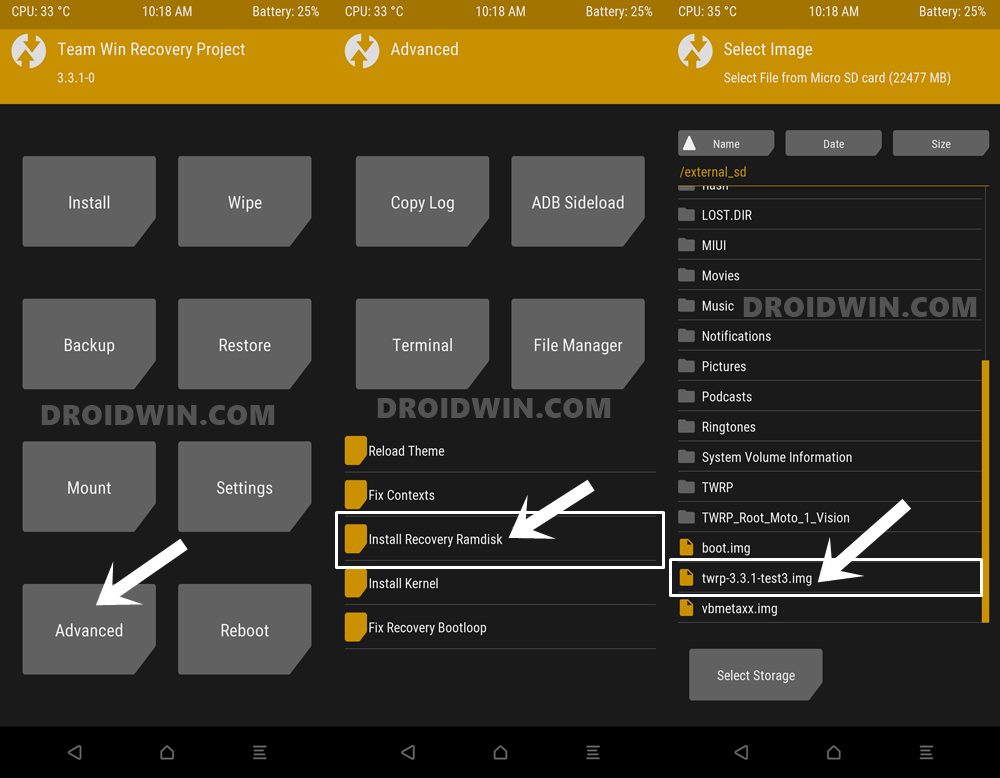
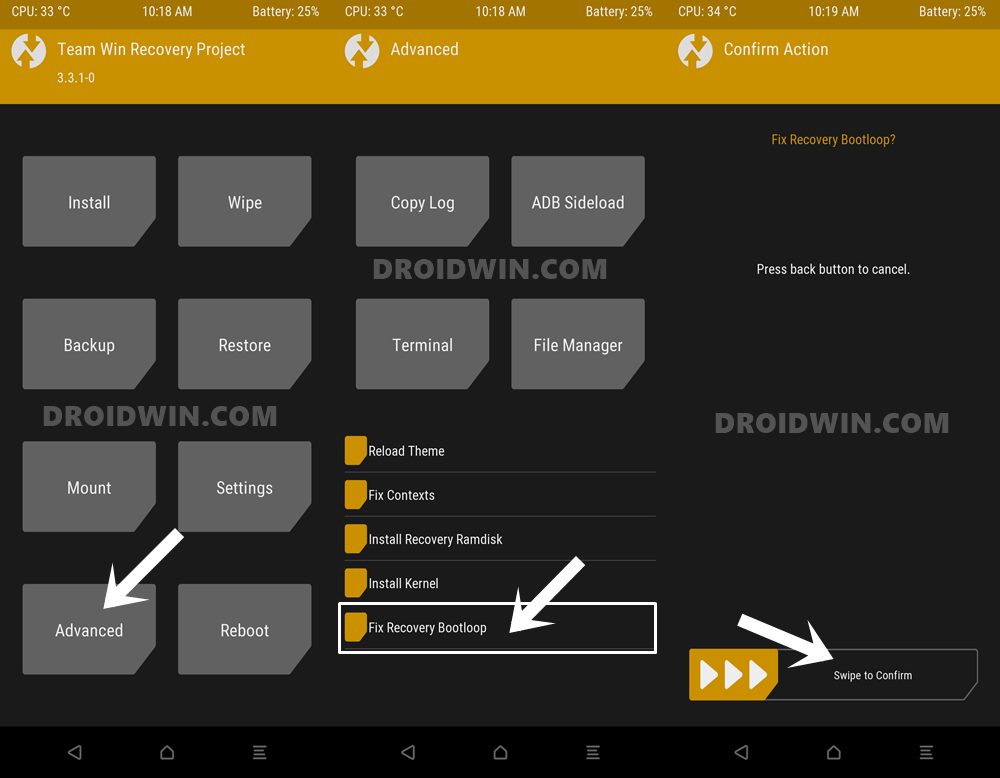
STEP 6: Install TWRP on Xperia 10 and Xperia 10 Plus
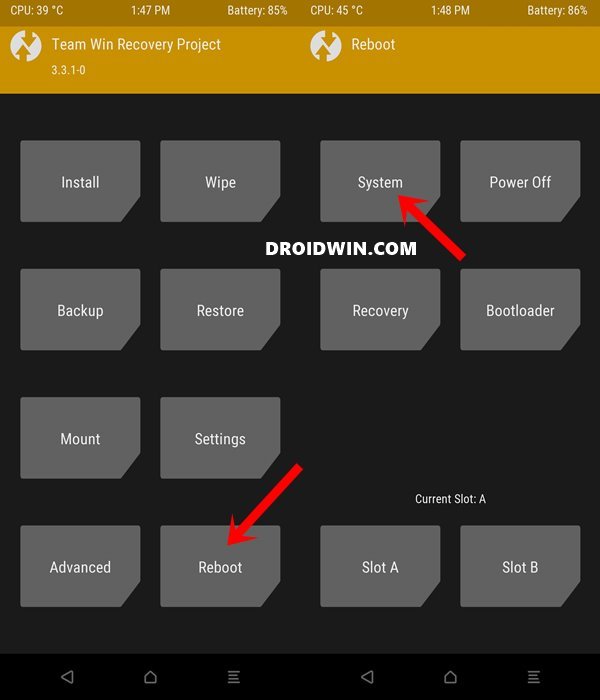
We will start off by temporarily booting the Sony Xperia 10/10 Plus to TWRP Recovery and then permanently install it. So make sure that the twrp.img file is placed inside the platform-tools folder. Likewise, also transfer one copy of this twrp.img file to your device. Also, verify that your device is booted to Fastboot and connected to the PC via USB cable. That’s it. On that note, we conclude the guide on how to install TWRP Recovery on Sony Xperia 10 and Xperia 10 Plus devices. If you have any queries concerning the aforementioned steps, do let us know in the comments. We will get back to you with a solution at the earliest.
How to Pass SafetyNet test after installing Xposed or EdXposedHow to Pass Magisk SafetyNet on Rooted Android 11Fix ctsProfile Mismatch Error on Rooted AndroidHow to use Core Only Mode in the new Magisk Manager?
About Chief Editor